
Getting started checklist
Okay, so you know what you want to sell. Now it’s time to build your Shopify store.
Before you start, you’ll need three things:
-
-
Business bank account
-
Website domain (& email address)
-
Shopify plan
-
Setting up a separate account for all of your business transactions will make it easier to record expenses and pay taxes further down the track.
You can purchase a website domain and business email address from Google, GoDaddy, or a number of other web hosts. Try to choose a domain name that’s simple, makes sense, and aligns with your target audience. You may choose to use your brand name.
Once you’ve got those, head over to Shopify and sign up for a plan. I’d recommend starting with Basic, as it’s the cheapest. You can always upgrade later without losing any data.
Pro tip: Shopify frequently offers a free trial and a few discounted months of membership for first-time users. If this deal is available, it can save you around $100.
Adding products to Shopify
Once you’ve made an account, you can start to add products to your store.
-
-
If the products you’ll be selling are sourced through AliExpress, you’ll be able to import them directly into Shopify using the DSers Shopify app, available for free from the Shopify App Store.
-
If you’re sourcing products from somewhere else or making your own goods, head over to the Products tab, accessible from the lefthand menu in your Shopify dashboard.
-
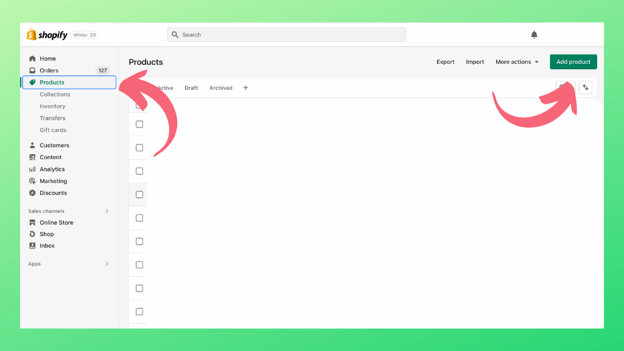
Click the large green Add product button in the upper-right-hand corner. This takes you to the product creation screen. From here, you can start adding your product details and media.
Write your product description
In the large box at the top of the page, enter your product description.
If you’re not sure how to write a product description, check out these guides:
You can also try out Shopify’s brand-new AI-powered product description auto generator. Click the purple stars to the left of the description box and choose your settings.
Beware: AI is better used for inspiring ideas – your Google ranking may be affected if you use AI suggestions exactly.
Add product images
Next, add your product photos – and videos, if you’ve got them.
If you don’t have any photos yet, see if you can borrow some from your supplier’s website. You can use free design tools like Canva to remove the background and customise your images.
If your supplier doesn’t have images (or you’re making your own goods), you can hire a freelance photographer or learn how to take your own product photos.
Here are some guides explaining how to take good product photos:
Pro tip: The file size of your product media can slow down page speed, impacting your ranking on Google. Use free online file compression tools to reduce the file size before uploading.
Map your variants
Skip this step if you don’t have multiple versions (variants) of your product, such as size or colour.
To create variants, head down to the bottom of the product creation page and click the box in the section titled Options. Here you can add any variants you might have.
Once your Shopify store is live, products with variants will display within the category pages looking something like this:

The Geometric Bucket Hat displayed above comes in two styles (variants): Mosaic and Quilt.
On the product page, that appears to shoppers like this:

Variants can be an effective way to increase sales, as they help buyers select specific features that best suit their unique needs.
Finalise product details
Lastly, it’s time to add the product details.
Go to the Pricing section and set a sale price for your product.
In the compare-at-price cell, you can input a number that will appear with a strikethrough next to your current price ($59.99). This is how you can demonstrate an item being on sale. If desired, you can give different pricing to variants in the Options section.
Fill in as much information as possible in the Inventory and Shipping sections.
To make the product ‘live’ on your site, select Active from the Product status section, select any relevant sales channels, and hit Save.
Don’t worry about tagging your products – we’ll do that in the next step.
Create product categories
Congratulations! Your first product is now live.
If you’re selling a range of products, you might wish to simplify the shopping experience for your customers by adding some collections.
These can then be set up in the Navigation menu to appear in your header or footer section, as below:
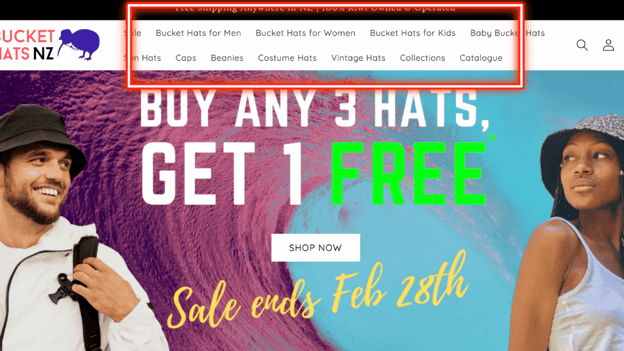
We’ve included key collections such as our Men’s Bucket Hats, Women’s Bucket Hats, and Vintage Hats in the header section to help buyers quickly find the products they’re looking for. You can also create subcategories by creating a hierarchical structure in the Navigation menu.
Here’s how to get started with product categories.
Setting up collections
Select Collections from the lefthand menu, just below ‘Products’, then click the Create collection button in the upper right corner.
From Collection type > Conditions select Product tag + is equal to and then create a tag for the last cell.
Once saved, all products tagged with that tag name will automatically be added to the collection.
Tag your products
Once your collections are all set up, head back over to the Product section.
From here, you can select which products you’d like to tag using the checkboxes on the lefthand side of each product line.
When you’ve selected all the appropriate products you’d like to tag, click on the three dots in the black floating bar at the bottom of the page.
Navigate your way towards Add tags, assign the tag you’ve designated for the collection, and voila – your store is almost ready to go live!


.png)
